CalcTool
Basics
Within CalcTool the channels recorded by a 2D data acquisition system can be further processed with the help of text-based calculation files to e.g. visualize data for development purposes in various plots provided by the 2D software or for further calculations.
Further processing includes among others:
Signal analysis (Min, Max, Average, …)
…
What is a calculation file?
A calculation file is a simple text-based file which contains the instructions for a calculation.
There are two different types of calculation-files:
Type |
Extension |
Description |
|---|---|---|
Encrypted calculation files |
*.CCF |
unreadable and non-editable |
Unencrypted calculation files |
*.CAL |
readable and editable |
Unencrypted files (.CAL) can be opened by any user, even via the editor, and changed if necessary.
However, encrypted calculation files (.CCF) can only be decoded and then modified by 2D-Datarecording members.
Attention
Encryption of a calculation file does not always mean that the file contains secret information. Files are often encrypted to prevent editing by other users.
Important
Team license managers can get an application of 2D data recording to encrypt files! If required, please contact 2D via website!
Important
These CCF files are used to secure calculation files against changes, read access or modifications by others.
How to create/edit CAL-files
Since CAL-files are text-based files, there are several ways to edit them:
CalcEdit.exe
CalcEdit.exe is an automatically installed 2D-CAL-file-editing application, which is specially adapted to the editing of CAL-files. This application offers the following advantages:
Syntax checker
Automatic code completion
Parameter suggestion for instructions
Instruction list
Coloured distinction
All CAL-files are linked to the program. By double-clicking the respective CAL-file is displayed in CalcEdit.exe.
Text Editor
Editing a CAL-file via any word processing computer program
Editing CAL-files via CalcEdit.exe is usually done from the Analyzer. For this purpose, the Calculation File Manager (see 3.4) is opened via the tab Functions - Calculation File Manager.
Alternatively, the key combination <ALT> + <N> can be pressed in the Analyzer.
2D directories
To generalize file paths, there are certain placeholders in the 2D software which stand for different directories.
The possible placeholders are:
Name of directory |
Short-cuts |
Placeholder |
|---|---|---|
Event directory |
<CTRL> + <ALT> + <E> |
<EventDir> |
Measurement directory |
<CTRL> + <ALT> + <M> |
<MesDir> |
Race application directory |
<CTRL> + <ALT> + <A> |
<AppDir> |
Race application CAL directory |
<RaceDir>\SYSTEM\CAL\ |
|
<SysCal> |
||
User data directory |
<CTRL> + <ALT> + <U> |
<UserDataDir> |
<RaceDir> |
||
User data CAL directory |
<UserDataDir>\CalFiles\ |
|
<UserCal> |
||
Application data directory |
<CTRL> + <ALT> + <D> |
<AppDataDir> |
RootDirectoryTMP |
<TempDir> |
|
Name of active measurement |
<MesName> |
|
Name of active event |
<EventName> |
Important
These placeholders can also be used at file-paths when calculation files are included!
Important
The respective paths on your PC can be seen at: WinARace - Settings - Folders - Protocoll
2D Software directories
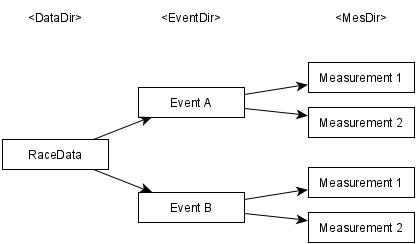
DataDir, EventDir & MesDir
The definition of the directories is done backwards from the measurement-directory: The individual measurements are located inside the measurement directories, which in turn are located inside the respective event directories. The event directories are combined in the data directory. This data directory is usually located directly after the root directory, e.g. C:\ and is normally called RaceData, so the path ends up as C:\Racedata\.
RaceDir
Race directory contains among others the 2D sub-applications.
UserDir
User directory contains various user-related data such as templates, CAL files and scripts.
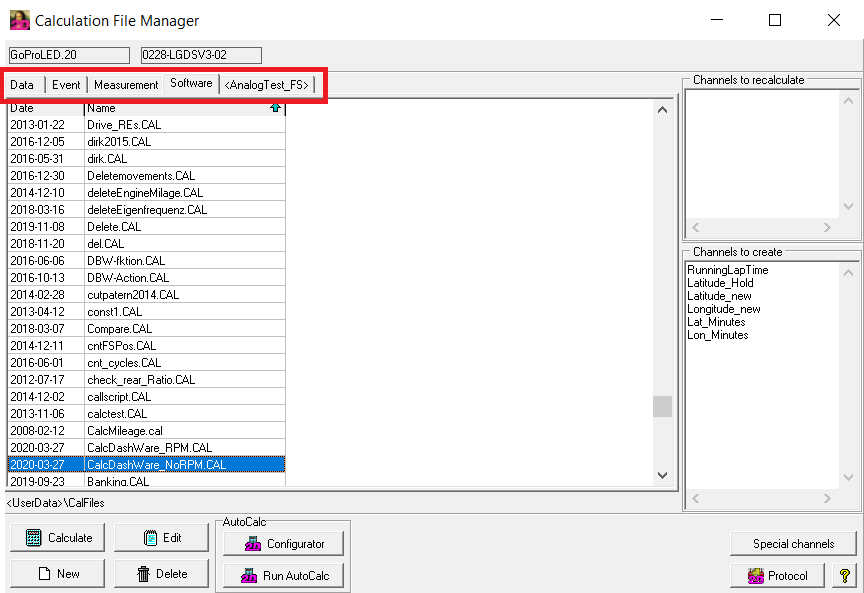
Calculation File Manager
The Calculation File Manager is opened via the tab Functions Calculation File Manager.
Alternatively, the key combination <ALT> + <N> can be pressed in the Analyzer.
The CAL-files can be stored in different directories on your computer.
The red box is highlighting the directories.
It depends on the application of the respective CAL-file where it should be stored.
Calculation File Manager - Calculation file directories
Directory |
Path |
WinARace-Shortcut |
|---|---|---|
Data |
<…><DataDir> |
|
Event |
<…><DataDir><EventDir> |
[CTRL] + [ALT] + [E] |
Measurement |
<…><DataDir><EventDir><MesDir> |
[CTRL] + [ALT] + [M] |
Software |
<RootDir>\Users\Public\Documents\Race2020\CalFiles |
[CTRL] + [ALT] + [U] |
<…> |
<RootDir>\Users\Public\Documents\Race2020\CalFiles\<…> |
By using the directories correctly and storing the Events and Measurements on a server/data storage, a team-internal CAL-file management structure can be set up:
Data (Server/Data storage)
In this directory calculation files are stored which should be accessible for every other Analyzer user of a team. These calculation files are valid for all Events and Measurements.
Event (Server/Data storage)
In this directory calculation files are stored which should be accessible for every other Analyzer user of a team. These calculation files are only valid for the respective Events and its Measurements.
Measurement (Server/Data storage)
In this directory calculation files are stored which should be accessible for every other Analyzer user of a team. These calculation files are only valid for the respective Measurements.
Software (User PC)
In this directory calculation files are stored which should be accessible only for one, dedicated Analyzer user of a team.
<*…*> (User PC)
In this directory calculation files are stored which should be accessible only for one, dedicated Analyzer user of a team. Compared to Software calculation files, these files can be stored in different sub-directories for better organisation.
Important
Accessible means that the calculation files can be executed by any user. It should be noted that if the calculation files are saved as CAL files, that any user can also edit them. If a file is to be executable by any user, but not editable by any user, it must be saved as a CCF file (see 3.1).
Important
The calculation files stored in Software or <…> are usually debugging CAL files or CAL files with confidential calculations that must be actively shared with other Analyzer users to be passed on.
Important
If the Calculation File Manager is opened for a measurement from Event B, the calculation files of Event A are not visible!
Important
Sub-directories (<…>) can also be created in this Software directory for better organisation, but only one of these subdirectories can be displayed in the Calculation File Manager at a time.
Important
Under the placeholder <…> a user-defined folder inside <UserDataDir>\CalFiles\ can be selected with a right click on this tab
General structure of CAL-file
A CAL-file has the same file structure as a Windows INI-file and can be also seen as a text-file.
For better clarity, as well as to divide the calculation into different levels/tasks, groups are used in calculation files.
Important
It contains at least one group whose name is enclosed in square brackets.
Important
Group names must be unique and can be used for creating channels!
Important
More than one group is calculated chronologically.
Attention
It is very important to use groups, because after each group the respectively grabbed memory is released again when the respective calculation file is executed. If no or too few groups are used, the required memory may not be sufficient for calculating long measurements. Beside using many groups, include files (chapter 6.1.2) can be used to save memory!
[Spin] ; Name of group
Then follow the calculation instructions, with each instruction starting with the channel to be created.
[Spin]                                 ; Name of group
Speed_Diff = ...                       ; Calculation ...
Since not every channel has to be saved, a distinction is made between two types of channels.
Channels
Temporary channels
Start with a C followed by a number (e.g. C1). These channels serve as auxiliary channels within a group and are not saved. Therefore, they are only valid in the respective group.
...
C1=...                                 ; Temporary channel
...
Attention
It is very important not to use too many temporary variables, because depending on the length of the measurement, there may not be enough memory available for the calculation. Temporary variables can also be overwritten within the group and thus used again (see example Rear wheel spin of a bike).
Permanent channels
Channels that do not consist of a C followed by a number (e.g. V_rear). In addition to the original recorded channels, channels created in previous groups or other CAL-files are called permanent channels!
...
SpeedDiff=...                                 ; Permanent channel
...
Important
For debugging purposes, command SaveTemporaryChannels can be used. All temporary channels will be equipped with an underscore; thus, they are permanent channels, and will be saved (#C1 #_C1). Use Delete(#_C*) for removing them.
Important
Within a calculation, both types of channels are called with #.
Important
Temporary and permanent channels can be used together in calculations as well as in calculations with constants or numbers!
Creating permanent channels
As mentioned in the previous section, the channel to be generated permanently is placed at the beginning of each instruction line.
A distinction is made between direct and indirect generation of permanent channels:
Type |
Description |
|---|---|
Direct |
The channel name of the permanent channel to be created is at the beginning of an instruction |
Indirect |
The channel name of the permanent channel to be created is the group name in which the instruction is currently executed |
...
SpeedDiff=...                                 ; Permanent channel
...
[Spin] ; Group name ... Result=... ; Permanent channel with name of group ...
*Example:* Rear wheel spin of a bike
Example: Calculating rear wheel spin with permanent and temporary channels
[Spin]                                 ; Name of group
Speed_Diff = -(#V_Rear, #V_Front)      ; Permanent channel (direct creation): Subtraction of two permanent channels
C1=/(#Speed_Diff, #V_Front)            ; Temporary channel: Division of two permanent channels
C1=*(#c1, 100)                         ; Temporary channel (overwriting temp. channel C1): Multiplication of temporary channel and constant
Result=Word(#C1, -32.778, 32.767)      ; Permanent channel (indirect creation): Set temporary channel as type Word with range --> Creating permanent channel Spin
Replacing channels
Channels originally recorded by a 2D measuring system can only be overwritten with a special command “NewResult”. For this purpose, the group in which the original channel is to be overwritten must have the name of the original channel.
At the end, the special command NewResult must be used instead of Result.
Example: Filtering original channel #Speed with median filter
[Speed]                                 ; Name of group --> original channel
NewResult = F(#Speed, Med (7))          ; Overwrite original recorded channel #Speed
Attention
The name of the group must have the name of the channel, which should be replaced.
Attention
The original channel is still present but not visible for the user. It is possible to restore the originally recorded channel at any time (see 6.3.18.3)
Creating constants
In addition to channels whose values usually change continuously, channels with constant values, so-called constants, can also be created with the Const function.
C1 = const(*value*, *Rate*) ; Create channel with constant value
Value: Set value of constant
Rate: Defines smapling rate in [Hz] of created channel
Example:
C1 = const(100, 200)
Value: Set value 100 of constant
Rate: Defines smapling rate 200 Hz of created channel
Example:
C1 = const(100, #v_Sat.Rate)
Value: Set value 100 of constant
Rate: Defines smapling rate to sampling channel rate as channel #V_Sat
Include files
Calculation files can also be used to set up as include file with optional parameter handover.
Include calculation files are very suitable for outsourcing frequently used routines and thus making the calculation file clearer.
For more information please click here.
Editing assistance
Code completion and parameter list
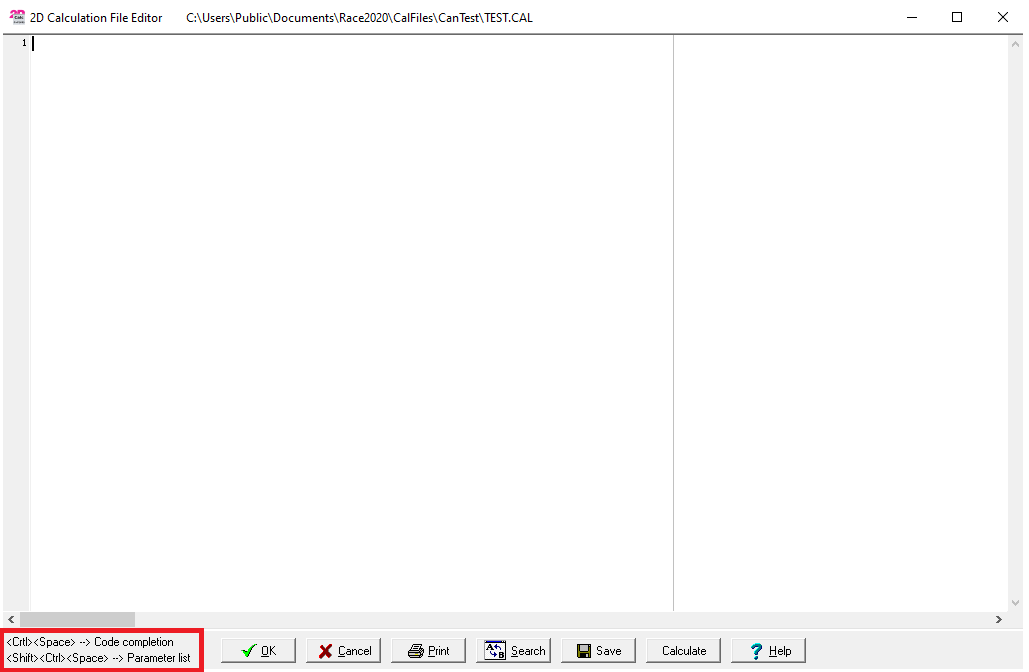
Code completion - Shortcuts
On the lower left side of the 2D-Calculation File Editor there are hints for Code completion and Parameter list.
Example: Execute-Instruction
Code completion - <CTRL>+<SPACE>
The software will display a list of suggestion (“command list”) Selecting the Execute instruction
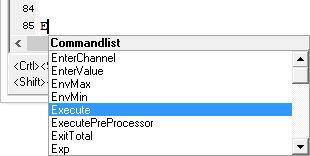
Code completion - Commandlist
Parameter list - <SHIFT>+<CTRL>+ <SPACE> A function call is always followed by a “(” character. A list of parameters for the instruction Execute is suggested after entering the parenthesis after a short delay

Code completion - Parameter list
Case-Sensitivity
Instructions in the command lines are not case sensitive.
Deactivating codelines
Single lines can be deactivated by using semicolons like for comments, but for larger code blocks it is more common to use curly brackets
Executing CAL-files
From Calculation File Manager
With a right click on the corresponding CAL-file it will be executed for all loaded measurements.
Important
If the CAL-File is executed via the button Calculate, it is only executed for the currently selected measurement (Currently selected measurement can be seen in red rectangular)
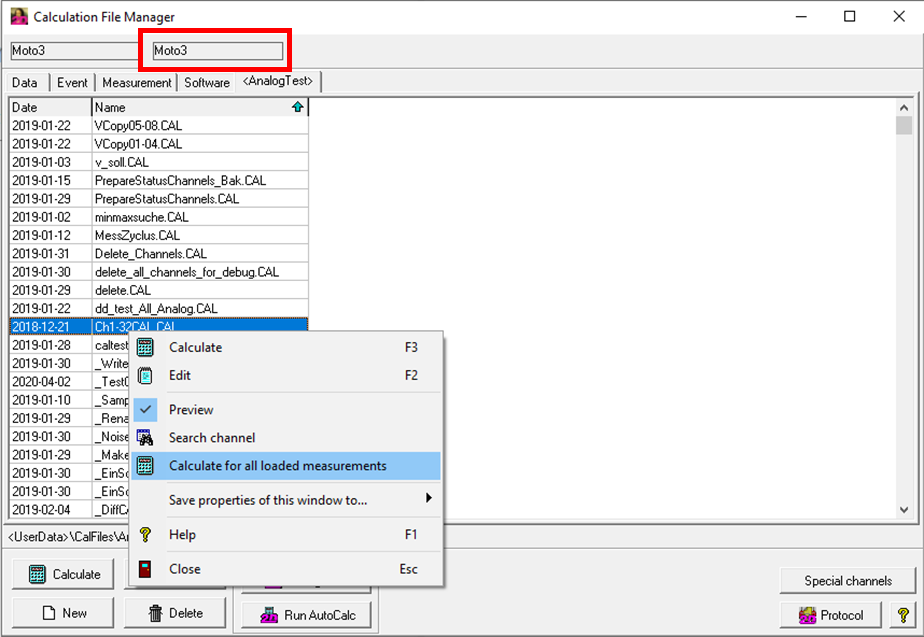
Execute caculation file from Calculation File Manager
From WinARace
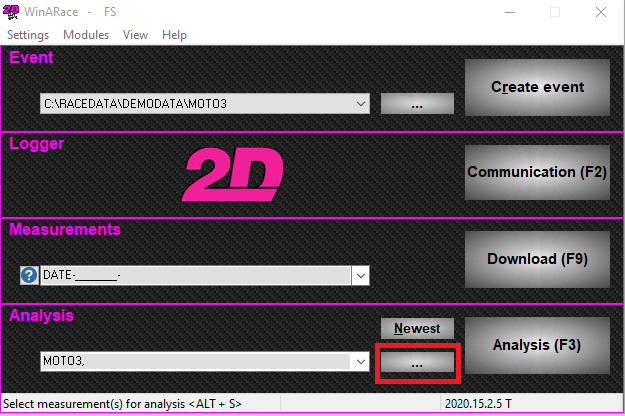
Execute caculation file from WinARace
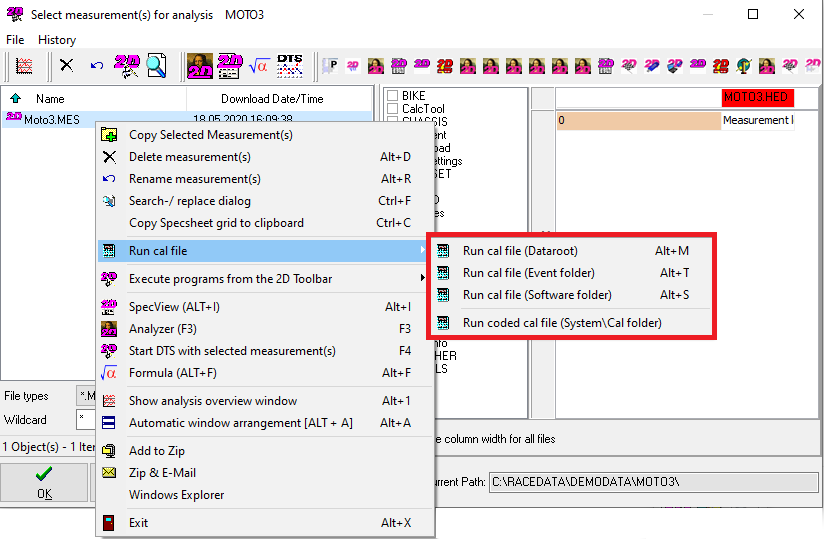
Execute caculation file from Calculation File Manager
Run cal file from the Dataroot |
<ALT> + <M> |
|
|---|---|---|
Run cal file from the current event folder |
<ALT> + <T> |
<EventDir> |
Run cal file from the software folder |
<ALT> + <S> |
<UserDataDir>\CAL |
Run cal file from “SystemCal folder”. |
<RaceDir>\SYSTEM\CAL |
Attention
At “SystemCal folder” only crypted files are selectable!
Important
Assignment of the CAL directories see 3.3
Important
The CAL-file is executed for all selected measurements
Automatic processing of the measurement data (AutoCalc Configurator)
With AutoCalc-Configurator you can define which CAL-files will be executed automatically after downloading the data from logger. Inside the Autocalc-Configurator the user defines which CAL-file(s) should be executed automatically after the download:
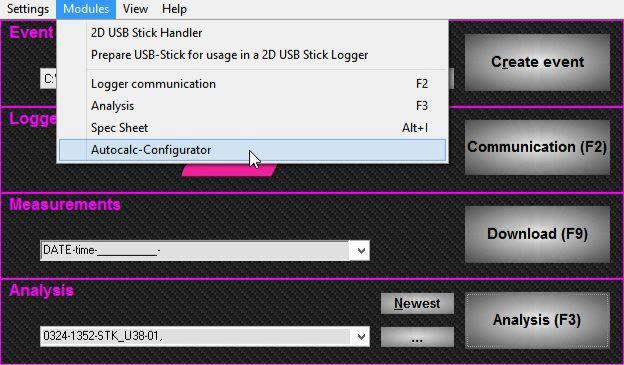
Opening AutoCalc-Configurator
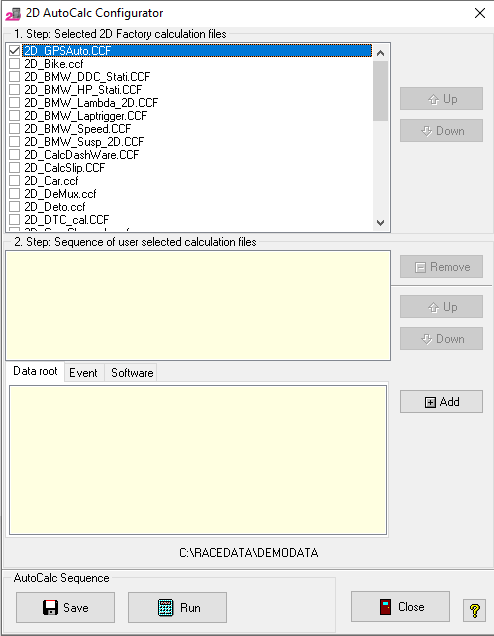
Selecting calculation files for AutoCalc-Execution
Selected 2D factory calculation files
Choose from a predefined list of delivered 2D factory calculation files. Their file names always start with “2D_”. After “2D_”, the next 3 characters are defining a group. You can only select one file within a group.
For example, you can select either “2D_GPS8Hz.ccf” or “2D_GPS4Hz.ccf” or “2D_GPSKit.ccf”, but not 2 or 3 of them.
Attention
Only one CCF can be selected within a group!
Attention
The factory calculation files are encrypted and can´t be modified or read by the user (see 3.1)!
Sequence of user selected calculation files
User calculation files can be added from three different directories (see 3.3):
Data root
Event
Software
By clicking the button <Add>, the CAL-file is added to the calculation sequence.
<Up> and <Down> can be used to change the order of the user calculation sequence.
Entries of the user calculation sequence can be removed by clicking on the <Remove> button.
If you want to execute the list of automatically calculated CAL-files independent from downloading data, you can push the button <Run> inside the AutoCalc-Configurator.
Important
Save the sequence and optionally run it to check proper calculation
Important
2D AutoCalc Configurator can also be called from the Calculation File Manager
SpecSheet - CalcTool link
The SpecSheet is a text-based HED-file, which can be edited by an Editor.
Users can create own SpecSheets by using an Editor and thus can pre-define a specified SpecSheet. Especially in motorsports, SpecSheets are used to store various information about vehicle setup, weather, or drivers for example during a race weekend or testing. These files are generated for every download (=reading the data from the data logger) in measurement folder and in logger communication mode it can be chosen in which SpecSheet the information should be written at measurement download automatically. Therefore, there is a separate SpecSheet with measurement related information for each measurement in measurement folder. The user of the program – the engineer, the data recording man, or the mechanic – is in charge of the maintenance and integrity of the data.
Mostly this SpecSheet is only used for documentation, but it can also be used in connection with the CalcTool because the CalcTool can read from information as constant from the SpecSheet and write information back into it.
Addtional manual
For more information about SpecSheet please click here
Attention
From CAL-files, HED-files can be read and write accessed!
Important
The respective HED-file can always be found in the respective measurement folder
Important
Via WinARace and Analyzer the SpecSheet can be opened in the SpecView with short-cut <ALT>+<i>
Important
The SpecSheet is linked automatically to CAL-files
Important
Beside SpecSheet other HED-files can be linked to calculation files too
Structure
Display of the same SpecSheet in SpecView (left) and in Editor (right)
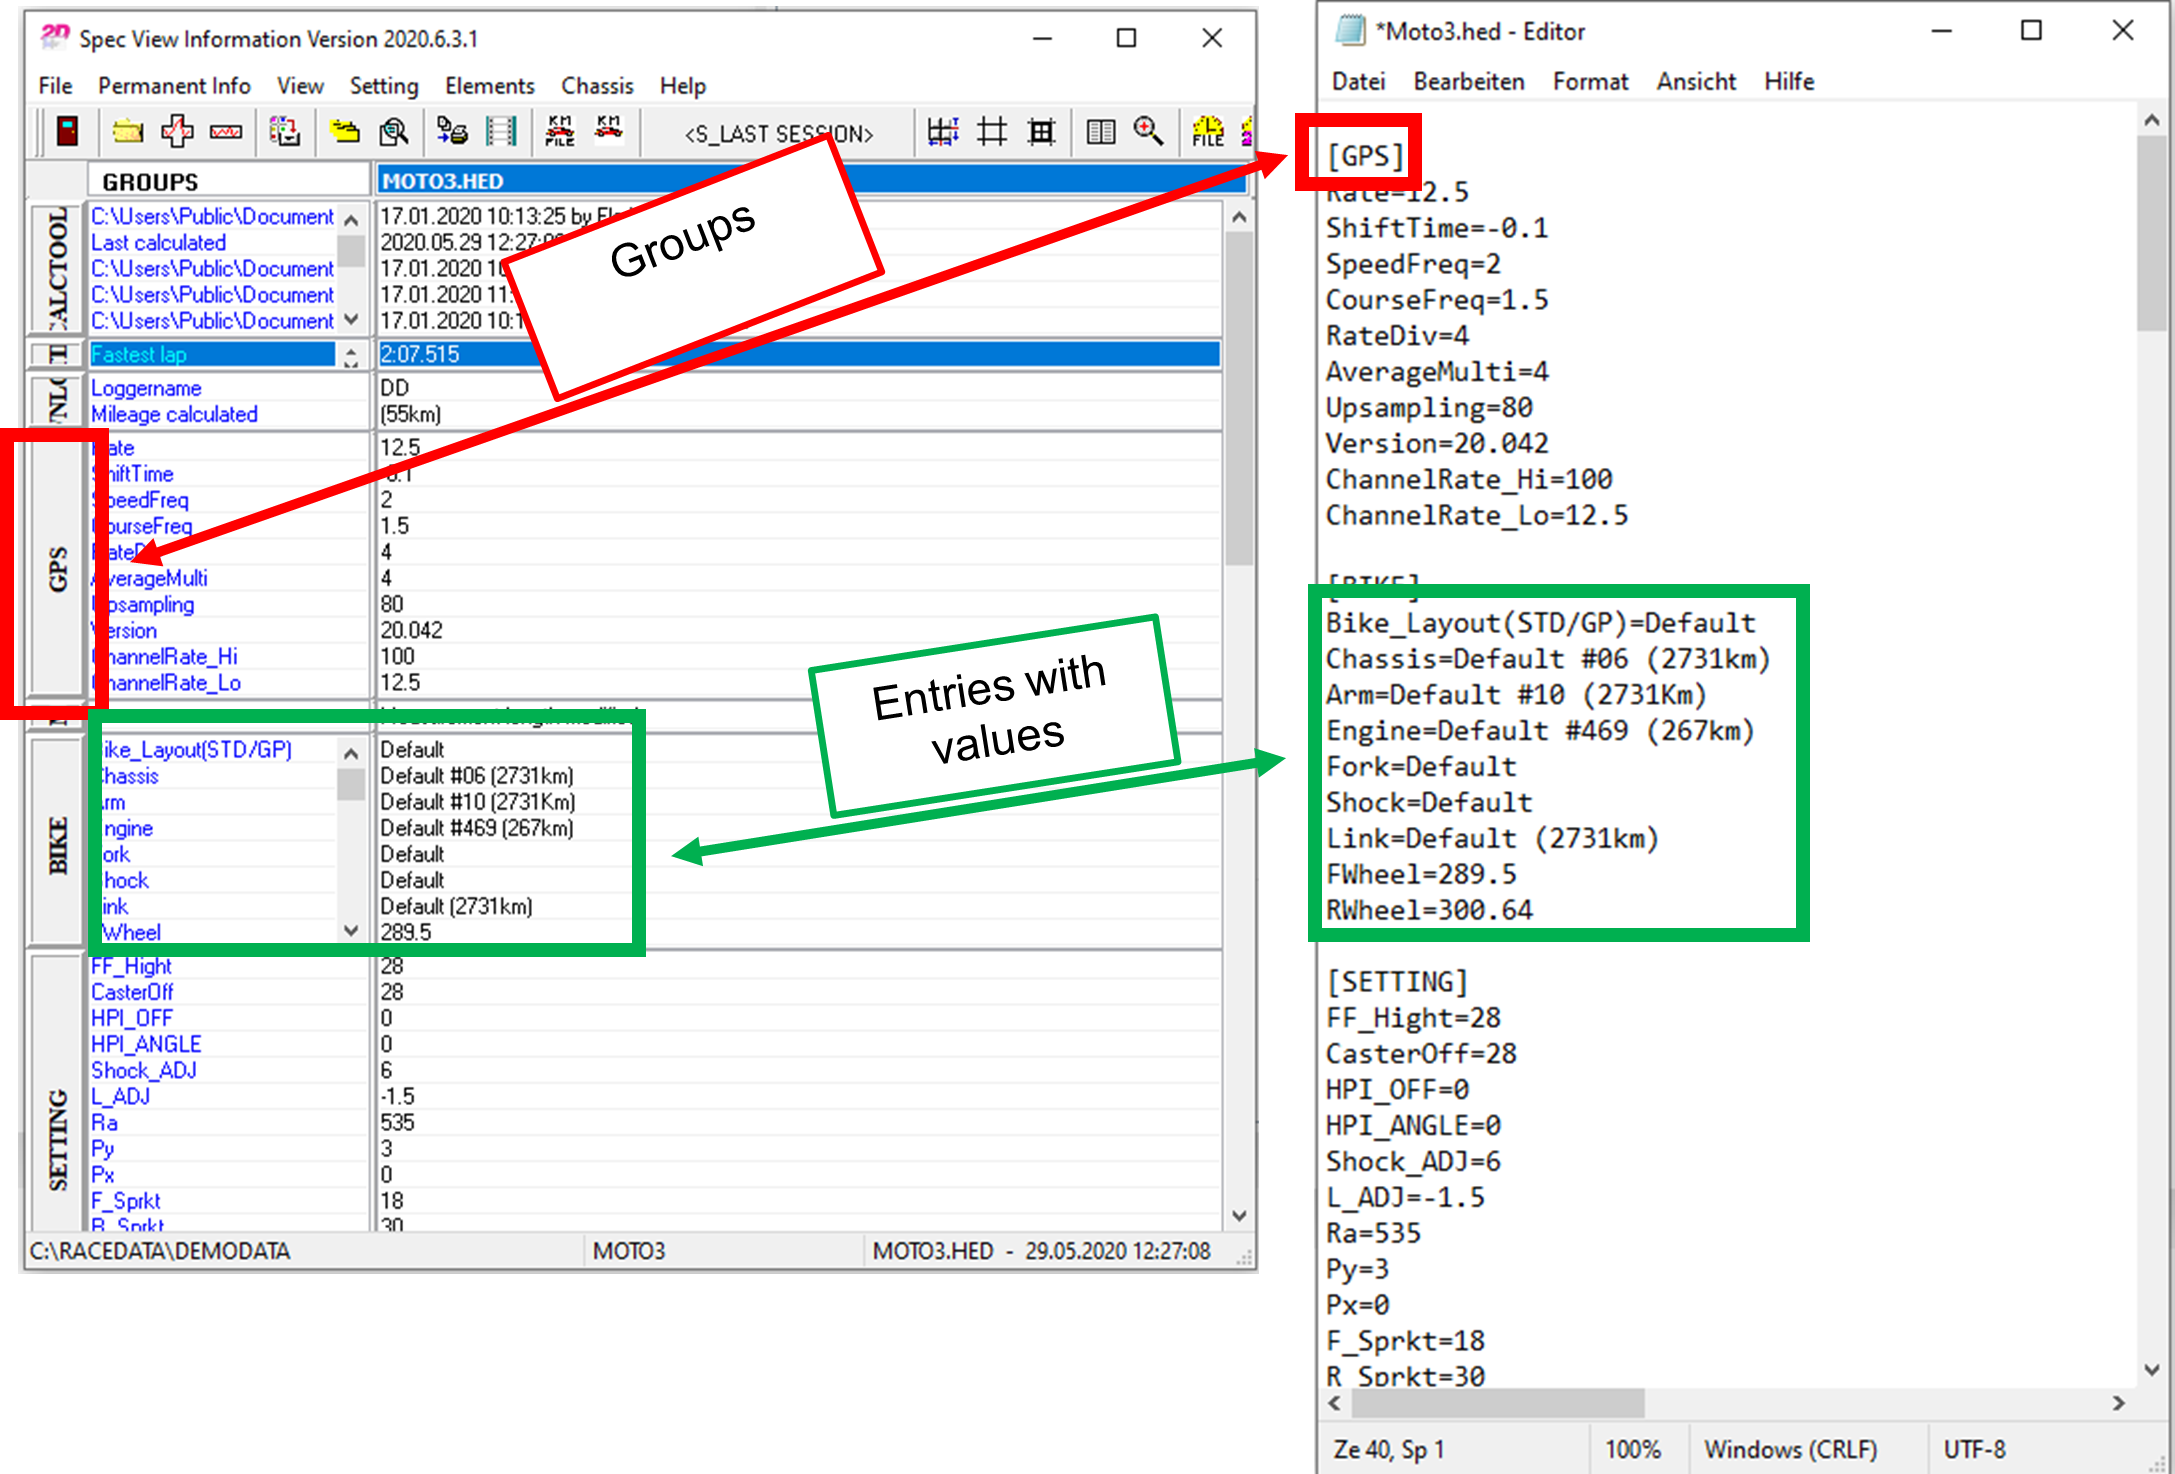
SpecSheet overview
Read and write access
Read values
CalcTool can read from information from SpecSheet as constants.
This is very helpful for, e.g., gear calculations (gearbox settings are done via (permanent) SpecSheet), mass calculations (adding vehicle mass, fuel mass, …) together for further calculations.
Syntax |
Description |
|---|---|
Group.Entry |
Retrieves the complete value of the entry “Entry” in the group “Group” |
Group.Entry.%N |
Retrieves the Nth part of the value of the entry “Entry” in the group “Group”. The part must be separated by a space character. |
Syntax |
Description |
|
|---|---|---|
C1=Const(Bike.Mass , Rate) |
170 |
Usable as CalcTool-constant |
Example:
BikeMass=Const(Bike.Mass, 100)      ; Read entry Mass from SpecSheet group Bike and set rate of created channel to 100 Hz
C1=Const(Fuel.Liters, 100)          ; Read entry Liters from SpecSheet group Fuel and set rate of created channel to 100 Hz
FuelMass=*(#c1, 0.750)              ; Calculate FuelMass by Liters * Density Benzin as constant
Mass_tlt=+(#BikeMass, #FuelMass)    ; Add masses and create permanent channel #Mass_tlt
Attention
Be careful with dimensions when reading values from SpecSheet!
It is assumed that the value of the entry “FWheel” in the group “BIKE” is “X-Z 439”
Syntax |
Description |
|
|---|---|---|
C1=Const(Bike.FWheel , Rate) |
X-Z 439 |
Not usable as CalcTool-constant (CalcTool ERROR) |
C1=Const(Bike.FWheel.%1, Rate) |
X-Z |
Not usable as CalcTool-constant (CalcTool ERROR) |
C1=Const(Bike.FWheel.%2, Rate) |
439 |
Usable as CalcTool-constant |
Example:
C1=Const(Bike.FWheel.%2, 100) ; Read entry FWheel from SpecSheet group Bike from 2nd part of entry and set rate of created channel to 100 Hz
Write access
Besides read-access, values can also be written back to the SpecSheet.
This functionality can be used for documentation and testing purposes.
Since a SpecSheet entry consists of only one value, only certain commands can be used to write to the SpecSheet:
Syntax |
Description |
|---|---|
Group.Entry =LastValue(#CH,) |
Last value of channel |
Group.Entry =FirstValue(#CH) |
First value of channel |
Group.Entry =MaxValue(#CH) |
Maximal value of channel |
Group.Entry =MinValue(#CH) |
Minimal value of channel |
Group.Entry =AvgValue(#CH) |
Average value of channel |
Attention
Always use Rate when writing values to SpecSheet. When writing to SpecSheet very low sampling rates are suitable.
Example:
Bike.Mass_total=MaxValue(#Mass_tlt, 1) ; Write max. value of channel #Mass_tlt to SpecSheet entry Mass_total of group Bike with rate 1 Hz
Complete example:
BikeMass=Const(Bike.Mass, 100)      ; Read entry Mass from SpecSheet group Bike and set rate of created channel to 100 Hz
C1=Const(Fuel.Liters, 100)          ; Read entry Liters from SpecSheet group Fuel and set rate of created channel to 100 Hz
FuelMass=*(#c1, 0.750)              ; Calculate FuelMass by Liters * Density Benzin as constant
Mass_tlt=+(#BikeMass, #FuelMass)    ; Add masses and create permanent channel #Mass_tlt

Bike.Mass_total=MaxValue(#Mass_tlt, 1)   ; Write max. value of channel #Mass_tlt to SpecSheet entry Mass_total of group Bike with rate 1 Hz
Important
Calculational results can then also be written (new entries can be created or already existing entries can be overwritten) to measurement related SpecSheet (not to permanent SpecSheet), what is important when using the SpecSheet print and export functions.
Functions/Commands
Besides the calculation instructions CalcTool provides a set of functions which are performed before or at the main calculation.
These functions are executed either by the pre-processor (function before the main calculation) or the postprocessor (at the main calculation).
This section describes the use of the pre- and postprocessor calculation functions/commands.
Contents:
- Preprocessor functions
- Postprocessor functions
- Additional formulas
- ChannelArray
- Rotational correction of channels
- Madgwick_IMU_AHRS
- Filter function
- Frequency adjustments
- GPS commands
- Channel manipulation
- If Function
- SOD
- Mathematical functions
- Logical functions
- Signal analysis
- Table functions
- Changing the storage type
- Additional channel information
- Channel handling
- Laps
- Sections
- Bike and car physical formulas
- Execute external programs
- Execution of CAL-files
- Error handling
- Predefined CAL-files
Comments
After a command line a comment can be added with a semicolon.