First steps
Introduction
The program WinARace is the front-end tool of 2D. From here you can start other software modules, like WinIt (communication tool), SpecView (data administration) or the analysis tool 2D Analyzer.
It organizes the folder structure of your data with events and master names.
WinARace is the 2D main software for navigation to all other sub-software packages like WinIt or Analyzer:
Define and change the current Event
Select the start measurement for the analysis tool
Start the 2D Analyzer
Select the master name
Start a download
Start WinIt
Set the software language
Select the user level
Set some important communication settings (same window as in WinIt – main menu item “Settings” ⇒ “Options”)
Activate/deactivate the protocol function
Configure the 2D Toolbar
Get version information of the various software modules
Menu tabs
WinARace starting window can be splitted up into five sections (refer to the next figure)
The main menu consists of four submenus:
Settings
Modules
View
Help
Settings menu
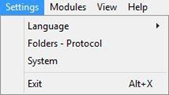
Settings menu
Language: here you can select the language you want to use in your software; German, English, French, Italian, Spanish or Japanese
Folders – Protocol: opens a window where you can check the folder structure and the protocol function of the software
System: opens a window where you can change some system- settings, please refer to section 3.1 !!!Link!!!
Exit: closes the program
Modules
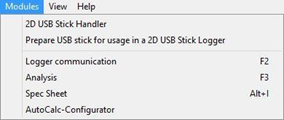
Modules menu
2D USB Stick Handler: starts the program 2D Stick Handler to manually download recorded data from a connected 2D/USB stick
Prepare USB stick for usage in a 2D USB Stick Logger: prepares a USB stick; such a prepared USB stick is called a 2D stick.
Logger communication: starts the program WinIt
Analysis: starts the program 2D Analyzer
Spec Sheet: starts the program SpecView and shows the selected measurement´s data
AutoCalc-Configurator: starts the program (Click here for more information about AutoCalc-Configurator)
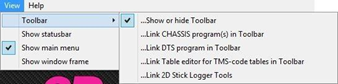
View
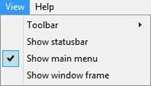
Settings menu
Toolbar: here you can decide whether you want to see the toolbar or not and you can modify your toolbar; for further information refer to section here for further information.
Show statusbar: shows or hides status bar
Show main menus: shows or hides the main menu
Show window frame: shows or hides the window frame
Help
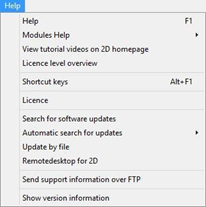
Help menu
Help: starts the program´s online help
Modules Help: here you can select help for different software modules
View tutorial videos on 2D homepage: opens the 2D
homepage where you can see the tutorial videos
Licence level overview: opens the 2D homepage where you can see an overview of the license levels and their functions
Shortcut keys: opens a table with shortcut keys and their meaning
Licence: opens the software license dialogue; there you can enter the license key
Search for software updates: searches online for software updates
Automatic search for software updates: settings for automatic software updates
Update by file: In some companies connection to the internet for update is not possible due to security settings. In this case it is possible to get an update file from 2D and import it with this function.
Remotedesktop for 2D: Support tool to give the 2D support the possibility to remotely connect to your computer – you will be requested by the 2D support to start it.
Send support information over FTP: sends an information file to 2D with license and firmware update notifications
Show version information: opens a window with information about your software version and license
Event Section

Event selection
An event is the directory where your measurement´s data is stored. It helps you to organize your data. Normally you create an event for each race weekend (or other kind of event you´re attending). It can be named as you want, for example the circuit or name of the event.
Please refer to sections create event and here for further information.
In the Event section you can create a new event or change the current event in two different ways. To create a new event click on <Create event>.
The first way to change the event is to select a directory directly from the drop-down list. There you can choose from the last eleven directories used. The second way is to load a directory from the event explorer. To start the event explorer click on < … >.
Select a new directory in the tree view on the left and confirm the directory with <OK> - afterwards the directory is displayed in the history list.
Additional information
For further information on how to create an event, the versatile functions of the event explorer and the data structure in general please here.
Logger section

Modules configuration
By clicking on the button Communication (F2) the program WinIt starts. In WinIt you can change the setting of your logger and other system parts.
Additional information
For further information please refer to the WinIt manual .!!!Link!!!
Measurements section

Mastername and download internal memory data
In the Measurements section you select the data´s master name and download the recorded data directly from a connected logger.
The master name is part of the data file name. It helps you to identify more easily the session (free practice, qualifying, race, test,…). The drop-down list contains up to 15 different (last used) master names. You can simply select one of them or enter a new one (depending on your license level).
For further information on master names and the nomenclature of the data please click here.
To download data from a connected logger with data on internal memory click the button Download (F9).
Analysis section

Analysis selection
In the Analysis section you have three different options to select a measurement you want to start with in the analysis tool 2D Analyzer.
You can select a measurement from the drop-down list. It is a history list of the eleven last used measurements of the current event.
Select the newest measurement of the event with the button Newest.
You can select a measurement of the current event in the file explorer. To start the file explorer click the button … .
To start the 2D Analyzer click on Analysis (F3).
Additional information
For further information please refer to the Analyzer manual!
Detailed information on WinARace functions
System Settings
You get to the System Settings via WinARace, Settings ⇒ System.
Here you can enable/disable the use of the different ways to handle the loggers. “Communicating 2D Loggers” means any logger you connect directly to your PC (via USB, TCP/IP, etc.). In addition you are able to select what should be done if such a logger is connected: do nothing, start a download or start WinIt.
If you enable “Use 2D USB Stick Logger”, you activate all software modules you need to handle the USB sticks with – to prepare them for recording or to download recorded data. In the dropdown-list you can select when the data should be downloaded if a stick with recorded data is detected: not automatically (you need to start the download manually), always or only if WinARace is running.
In the next dropdown-list you can modify the settings for the raw data.
At the bottom you have additional options on what should be done if data is downloaded.
Confirm your changes with Ok.
Toolbar
Toolbar
The Toolbar enables quick access to other programs or documents.
At the beginning there are often several programs and documents already linked in:
There are two ways to modify your toolbar:
Add default programs via the toolbar menu – View, Toolbar ⇒ …Link XXX
Toolbar menu
Right-mouse click on your toolbar

Add toolbar icon
If you choose <Edit/Delete> you can modify or delete some of the toolbar entries.
If you choose <Add> you can easily add another entry: Select the program/document you want to add, an icon (.bmp or .ico-format) and confirm with <Save>.
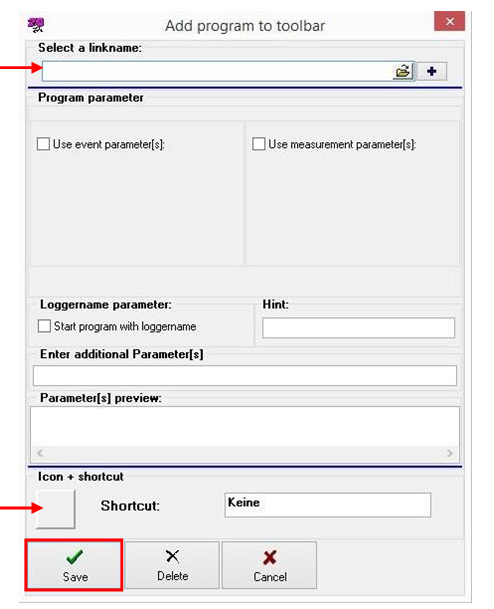
Add toolbar icon
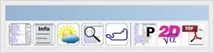
Typical icons used in the toolbar are:
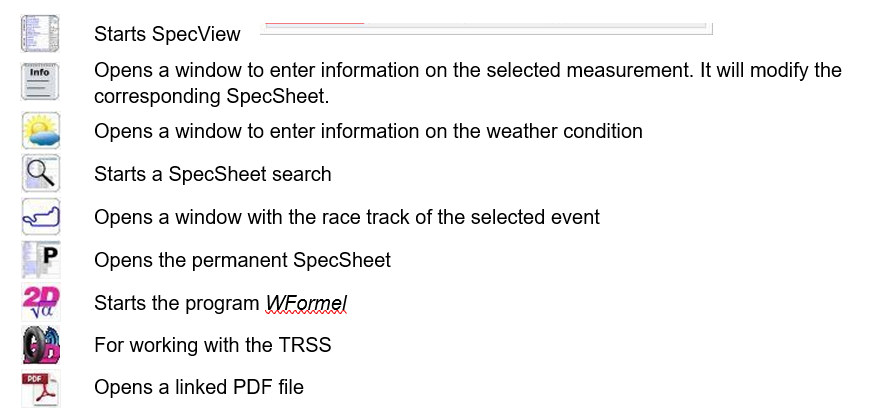
Typical toolbar icons
How to create an event
To create an Event click on Create new event in WinARace.
It opens the following window:
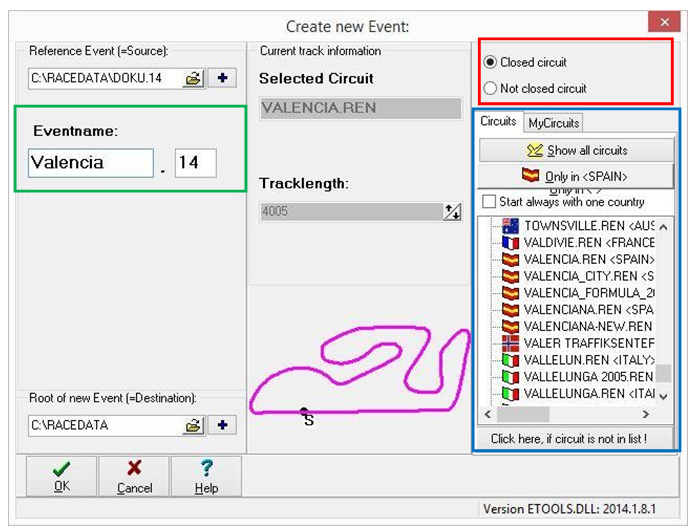
Create event
Select Reference Event
Important
From selected reference event important setting files like Special Channels settings or calculation files are copied to new event! Thereby, setting up a new event is more comfortable because new event has same setting files like reference event.
Select on the right-hand side if it is a closed circuit or not (marked in red)
Select a racetrack if it is a closed circuit (marked in blue
There are two different circuit tabs:
The tab “Circuits“: Includes a list of pre-defined tracks delivered with the 2D race software.
The tab “MyCircuits”: Contains track maps which have been created by the user via the analysis tool 2D Analyzer.
Important
If a track is not listed, select <Click here if circuit is not in list> and a basic circuit will be selected (Base.ren).
Enter a name in the field “Eventname” (marked in green)
Confirm your event with OK to create event
General data structure of measurement data
All measurement data are stored in the RaceData folder (e.g. C:\RaceData). In this folder you can find your events. Every single event contains information about the particular racetrack and the measurement data.
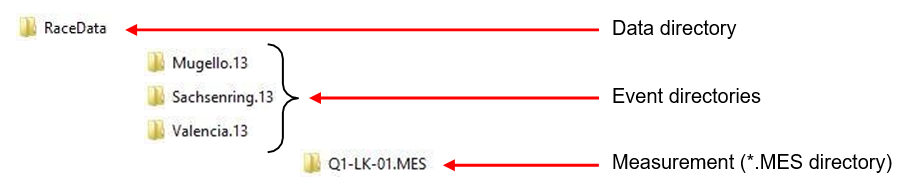
General data structure
Measurement nomenclature (master names)
The measurement´s name consists of three parts – the master name, (part of) the logger name and the number of download.
For example: |
||
|---|---|---|
Q1-LK-01.MES |
⇒ |
master name: Q1 (qualifying 1) |
logger name: LK |
||
number of download: 01 (first download) |
||
Test-CC71-03.MES |
⇒ |
master name: Test |
logger name: CC71 |
||
number of download: 03 (third download) |
||
1126-AL22-05.MES |
⇒ |
master name: DATE (date of data download, e.g. 26.11.) |
logger name: AL22 |
||
number of download: 05 (fifth download) |
||
Some of the default master names are: |
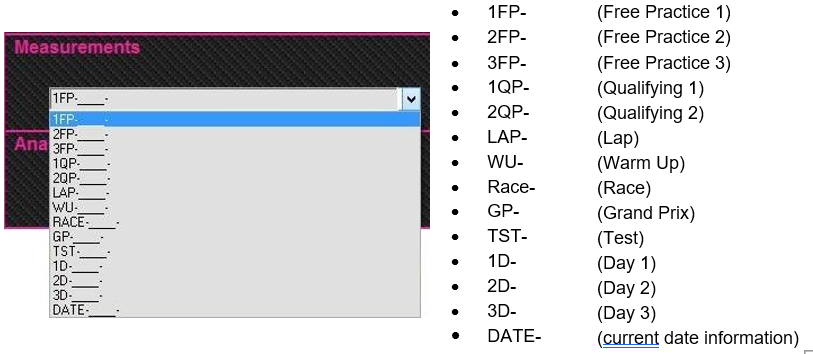
Download Masternames
“DATE- -” is a special master name. It is used to create measurement names containing information about the date when the measurement was downloaded.
The software replaces the part “DATE” of the master name by the month and day at which the measurement was created.
The format is MMDD, which means the first two characters are replaced by the month and the next two by the day.
The number of underscores ( _ ) specifies how many characters of the logger´s name are taken to create the file name (starting at the end).
Important
Depending on the license level of your software you may specify your own master names.
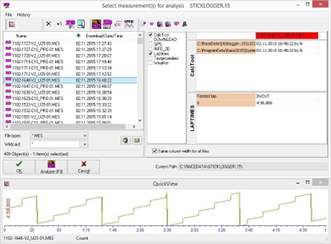
Event selecting – the 2D event explorer
Within the 2D event explorer you can select an event or change the settings of its measurements. To start the event explorer click on … in the Event section.

Open event explorer
The event explorer offers various options:
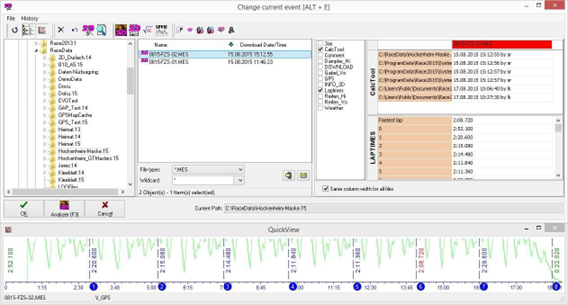
Event explorer
At the top of the event explorer you´ll find:
File:
⇒ Copy selected measurement(s)
⇒ Delete measurement(s)
⇒ Rename measurement(s)
⇒ Run cal file
⇒ Execute programs from the 2D Toolbar
History
As icons at the top:
Refresh tree and view list
Show/hide directory tree
Show analysis overview window
Deletes selected measurement(s)
Rename selected measurement(s)
Start CalcTool and use cal file from event folder
Search and replace channel names into 2D measurements
Start Analyzer with selected measurement(s)
Start SpecViewer with selected measurement(s)
Start formula editor with selected measurement(s)
Starts program DTS with selected measurement(s)
Linked programs from the 2D Toolbar
On the left side you´ll find the directory tree, in the middle there are the measurements listed of the selected event and on the right side you can have a look at the SpecSheet of the selected measurement. At the bottom there are buttons to confirm your selection (OK), start the 2D Analyzer or Formula program and cancel the selection. Below that there is the overview window.
Analysis overview window
You can select the shown channel by right-mouse-click on the analysis overview window.
Check and change the current measurement formulas – the formula editor
The 2D formula editor is a special part of WinIt. With this editor you can comfortably check and change the current formulas of each 2D measurement. The formula editor grabs special files which belong to each 2D measurement.
Within the 2D event explorer you can select the measurements you want to modify and start the formula editor. The editor displays all formula files (of each selected measurement) in the left tree view. You can recognize the several channels (different sensors) of the measurements.
Confirm your changes with <Apply>.
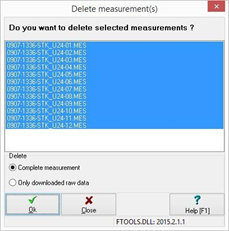
Deleting measurements from the current Event
Within the 2D event explorer you can select the measurements you want to delete and click the corresponding button in the toolbar (or right-mouse-click and select “Delete measurement(s)”). You will get the following window:
Delete .MES folder
There you can decide between the options to delete the complete measurement or only the downloaded raw data. Confirm your decision with Ok.

Confirm deleting .MES
Renaming measurements
It is recommended to rename the measurements with the function “Rename selected measurement(s)” as it renames all files inside the measurement´s folder. If a measurement is renamed within the normal Windows Explorer, the file names are not matching the measurement´s name. The 2D event explorer is able to recognize this mismatch and gives you an info message about it. Confirm this message with Ok to rename the files.
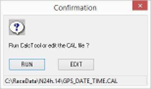
Starting the program CalcTool with selected 2D measurements
If you want to start the program CalcTool via the event explorer, you will get four different options to run cal-files:
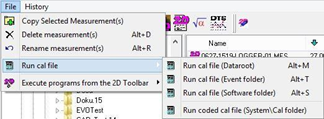
Run calculation files from event explorer
Start the program CalcTool with selected measurements and using any cal-file (by selection) from the data root.
Start the program CalcTool with selected measurements and using any cal-file (by selection) from the current event folder.
Start the program CalcTool with selected measurements and using any cal-file (by selection) from the software folder. This folder corresponds with the sub-directory called “Cal” located in your current Race-version.
Start the program CalcTool with selected measurements and using any coded cal-file (by selection) from the software´s “Cal” folder.
Afterwards you´ll get a list with the different cal-files available. In option 1, 2 and 3 you´ll be asked if you want to edit or run the cal-file. Option 4 directly runs the cal-file, as coded cal-files can´t be modified by the user.
Start execution of calculation file for selected .MES
File explorer
The file explorer gives you an overview of all measurement data of the current event. On the left-hand side you see all measurement directories and on the right-hand side there is the SpecSheet of the currently selected measurements. At the bottom is an overview window (QuickView). By clicking on it you can select the shown channel.
To search for specific measurements you can enter a part of its name in the wildcard-field.
Measurment expolorer